Thank You, Blogger, For A Lovely Five Months
Well, I started this blog to determine whether this was a method I wanted to use more permanently, and.....I've decided to do so.
So the blog entries already here will remain as they are, but future posts will be moving and continuing at http://thesnowpit.com/life.
Please update your bookmarks and RSS subscriptions.
Thank you!
Sunday, December 28, 2008
Moving Servers
Saturday, September 27, 2008
A Californian in Calgary
What a Great Place, Eh?
Well, after thousands of miles of driving, one student permit, and a few weeks of living here, I can honestly say: As an American living in Canada, I think this place is great.
There are a few obvious differences up here compared to the States - they only sell butter in huge 1lb blocks, all of a sudden I have a need for my coin pockets with the loonies and twonies, speed limits are much lower, and everyone seems to want to be outside (at least now, while it's warm). But on the whole, it feels very similar.
One thing I particularly like is the transportation system. I can hop on a train and be downtown in about 20 minutes after leaving my doorstep. Along those lines, I just returned from Whistler, taking the bus from Kamloops to downtown Calgary and then the train the rest of the way. I also particularly like how most people up here seem happy, attentive, and resourceful. I've never lived in a place with quite that kind of societal vibe.
However, despite this being an English-speaking country with laws very much like home, I still needed to jump through the official hoops to become a student here. I thought I'd write the steps down so others could benefit.
To become a full-fledged member of society here, I needed:
- A Study Permit, which I applied for in person at the Los Angeles Canadian Embassy at the beginning of the summer. Their website instructions made it easy. I received the actual permit when crossing the border in August.
- A SIN Number, which took the longest of anything to apply for. Like a SSN in the States, I walked in to an SIN office and showed them my passport, study permit, and my offer of employment from the University. Once my employment contract was in the exact same format that they wanted it in, I got my SIN number right away.
- A Bank Account, for which I actually didn't need a SIN number, just my student ID card and some money to deposit.
- Health Insurance, for which I simply found a local application office and brought my study permit, my passport, and proof that I lived in Calgary (the proof I use was my new SIN paper with my address). The coverage retroactively started on the day I entered Canada.
- I also found Travel Insurance companies who provide health insurance for when I travel outside of Canada. I couldn't find any online information while in the States, but up here there are lots with brochures and prices readily available.
- Car Insurance, which students need to drive here even though they don't need an Alberta driver's license or an Alberta-licensed car. We have State Farm insurance in the States, and it exists here up in Canada too, so I just transferred the policies.
So, as I sit here munching on Okanagan blue grapes and writing this, life is pretty good. Oh, and school is great too. I can't wait until Roy moves up here next year!
Tuesday, August 19, 2008
Leaving Los Angeles
Ten Things I Will Miss About Southern California
(And Ten Things I Won't)
Well, the time has come. I'm leaving Los Angeles. I've lived here for the overwhelming majority of my life, and now it's time to leave not only this city, but this country.
Who knows where life will lead from here, but I thought I'd put together some thoughts of what I will miss. Of course I'll miss my friends, my family, the fun jobs I've had here, and the familiarity of living in one place for a long, long time.
But I also wanted to put together a list of things I will miss about Southern California itself, as a place - that is, things unique to here and nowhere else.
And, after much thought, here are the lists....
Ten things I certainly will NOT miss about Los Angeles:
(10) Summers so hot that you can't go outside on some days
(9) Getting 150 miles per gas tank because of stop-and-go traffic
(8) Paying way too much for rent
(7) The way no strangers want to look you in the eyes
(6) The public transportation system (or lack thereof)
(5) Paying way too much for groceries, because stores pay way too much rent
(4) The belief that honking a car horn (or speeding) actually solves problems
(3) Smog, and general pollution
(2) The Los Angeles Culture of Stress
(1) Traffic
And Then... Ten things I will miss, and miss dearly:
(10) Mount Baldy - My roots in canyoneering, climbing, hiking, and skiing
(9) The Getty Museum
(8) The Griddle Cafe
(7) Picking (and eating) Prickly Pear Cactus Fruit in the fall (yum)
(6) Getting tough feet from walking in hot sand all summer
(5) Joshua Tree National Park
(4) Great Persian Food
(3) The Sierras, especially the Ansel Adams wilderness
(2) Oak Trees, especially Live Oak trees
(1) The Ocean, which I can swim in all year round
So there you go. Wish me lots of fun in Canada!
Monday, August 11, 2008
Return From Washington
The Complete Tour
Well, it's been quiet for a while here in The White Room because I've been in the Great Pacific Northwest kayaking and climbing.
The two main chunks of the trip are posted here on the blog, both back-dated to the dates they occurred:
(1) Climbing on Mount Baker, via the Squak Glacier (July 23-27, 2008) for fun
(2) Kayaking in the San Juan Islands (August 3-9, 2008) for work
The overall trip was quite nice and especially apt since I am departing for Canada very shortly. Oddly enough, when I returned home, I had been away for long enough that I felt like I had never left. In other words, home seemed like a just another place to visit, with all the comfortable lovely benefits of actually being home.
Now all I have to do is wash laundry, pack all my stuff up, and move out of the country.... Woo-hoo!
Saturday, August 9, 2008
Kayaking in the San Juan Islands
Sixteen Girl Scouts and One Awesome Company
August 3-9, 2008
Trip Stats:
- Locations Visited: Lopez Island, Flower Island, Blakely Island
- Time and Distance: 4-6 nm per day: five kayaking days on the trip.
- Difficulties: Rough water, large vessels in shipping lanes, fog and cold
- Highlights: One of the absolutely most beautiful, wild, and relaxing places on Earth
I had the great luck to work for Alpine Training Services to lead a seven day kayaking 'Girl Scout Destination' trip to the San Juan Islands. The islands are a beautiful and rugged place to kayak, and the trip setup helped teach the girls about leadership and the wonderful sport of kayaking.
Trip Report
When I was a Girl Scout growing up, the organization was suffering. Spread over too many councils with unclear leadership, it seemed that the Girl Scouts needed to find something new to offer. In the intervening years, the Girl Scouts (GSA) developed 'destinations', or places girl scouts could visit via trips organized through GSA, and learn life-long skills. This trip was one such destination offered.
Immediately after dropping off the rental car from my climbing trip, Travis picked me up at Thrifty car rental and off we went to Lopez Island. I had previously worked in the islands for the incredible Camp Nor'Wester in 2002, and it felt good to be back 'home'.
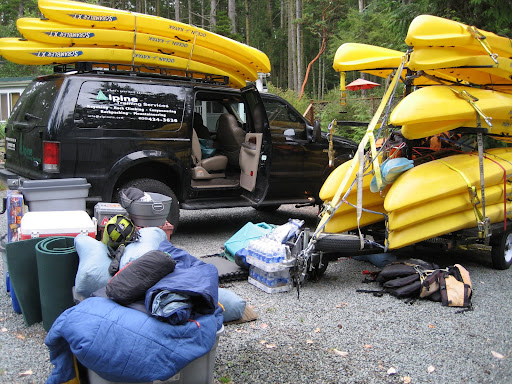
We stayed with the Johnsons on Lopez, and they generously allowed us to use their computer, their shower, their washing machine, their driveway, their garage, heck, even their cat kept us company. Here is a photo of the 20,000 pound car and trailer load that was the gear to run the trip:
After a few days of scouting out our options, visiting San Juan Island for permits (and ice cream) and spending a plethora of time at Holly B's Bakery, it was time to return to the mainland to pick up Sandra and Jo, two additional guides, and then to begin the trip.
The sixteen girls flew in from all areas of the country, and were 15-18 years old. We had folks from Baltimore, Colorado, Georgia, Kansas - essentially anywhere but Washington. A few pairs already knew each other, but mostly everyone came from different areas and different councils.
After staying at Deception Pass for the first night (one of the most beautiful camping areas I've been), we got on the ferry to Lopez, walked to Odlin to camp for the night, and played some teambuilding games on the beach. Later in the evening, we got into kayaks and on to the water for the first time.
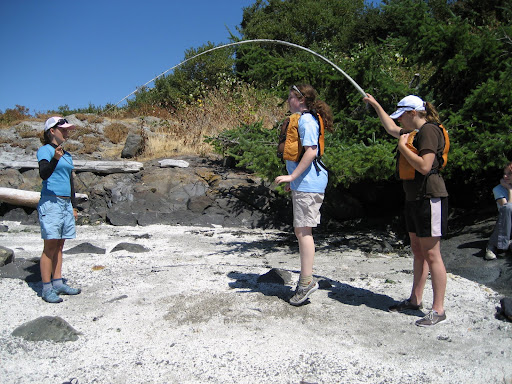
The next day, we got up early. We intended to paddle the 4nm to Spencer Spit on the east side of Lopez. It involved some calm waters in the southern Upright Channel (on the west side of Lopez), an exciting ferry dock crossing, and some minor choppy water on the east side of Humphrey's Head. Here we are nearing the north side of the Upright point before the ferry port:

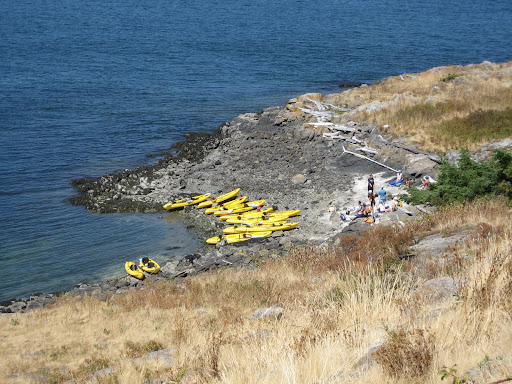
We also stopped on Flower Island, a beautiful island where the girls played jump rope with seaweed:
And then some of us climbed to the high point on the island to view the Lopez Sound. Here are our kayaks landed on the Flower Island Beach:
We then landed on the Spit and headed off to camp. The group was slowly learning about tides and currents and trip planning together, as I intended them to take over the show on the last day.
The next day, we did a day tour of the group's choosing, this time north to Blakely Island. We crossed the Lopez Sound (making good use of the key of buoy colors in our tide charts to identify different shipping channels) to Willow Island (but did not land) and then explored the shores of Blakely.
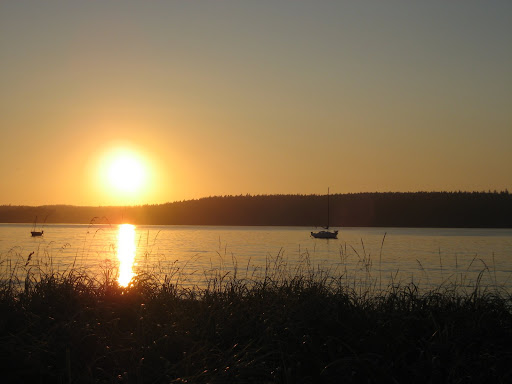
On the 6th of August, we returned to Odlin with much less scatteredness than our trip out on the 4th. The group was bonding as a whole, and it was quite fun to see. Back at Odlin, it felt like home to sleep in my 'Mid on the grass. The sunset that night was beautiful:
That night, we turned over the planning of the last day to the group. They knew how to read tide charts and maps, and what point and sweep did, and had even learned a little bit about kayak rescue. Jo, Sandra, and I were working great together and would still support them, but they were planning on their own. They worked out timing to paddle down to Lopez Village to get fudge (yum) and we got up and packed in style the next day.
The next morning dawned cold and foggy. Here is a picture of them organizing a beautiful raft-up in the fog just south of Upright Channel in the sound:
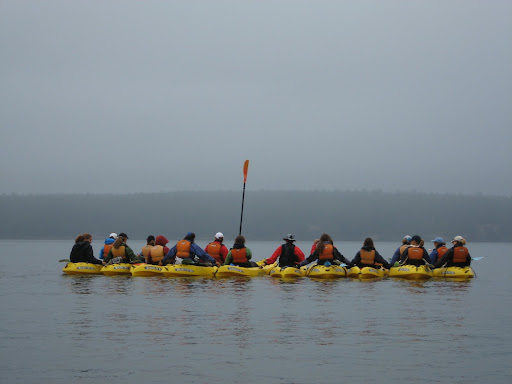
The weather was bad, but the group was very brave and worked quite well together under the conditions. At one point, we were fighting probably 1.5 knot currents and 15mph winds. But they had the presence of mind to land on a beach, warm up, eat some food, and revise their plans to end at Lopez Village. Travis had planned on being there, and so it worked out well.
At the village, we ate fudge, lounged around in the now-sunshine, and then walked the 5 miles to the ferry landing, eating berries along the way. Back on the mainland, Sandra and Travis had picked up pizza and we headed to the Kent KOA (the all-time worst place I've stayed in my life, but we didn't know until we got there). But the girls had a lovely night anyway, signing shirts and making contact lists. I was so proud of them that they were basically making an amazing trip on their own at that point.
The last day was a hectic day spent partially sightseeing in Seattle and partially dropping off girls. It was stressful being back in a city after the wonderfulness of the islands, and I ate at Panda Express which promptly gave me 10 hours of food poisoning. Too bad we just couldn't live on Lopez forever. That would be nice.
Overall, it was a wonderful trip. The girls were great, the place was beautiful, the trip went smoothly, what more could one ask for? If you like you can view all the rest of my photos from the trip.
I also wanted to say that this was my first time working for Alpine Training Services and they are a great company. I have known Darren for a long time, but it was quite fun to get to work with Travis (Darren and Travis are co-owners) on this trip. They truly care about their clients more than making money, and what a fun and goofy group of people to work with! I loved it.
Sunday, July 27, 2008
Mount Baker Via The Squak Glacier
The Long Way Home
July 23-27, 2008
Trip Stats
- Distance/Gain: 7 miles, 7,000' one way
- Trailhead: Scott Paul Trailhead (603.1) off of FS Road 13. (Directions: Take Hwy 20 East to Baker Lake Road, 12 miles to a left on FS Road 12, 4 miles to a right on FS Road 13, trailhead at end of road.)
- Time: One day to Crags View base camp, one crevasse rescue practice day, one summit day (24 hours), one rest day, one descent day (for us)
- Difficulties: Grade III, 40 degree snow, glacier travel
- Highlights: Beautiful, challenging, a less-travelled route
Overview
Mount Baker dominates the skyline of Northwestern Washington. In an area that holds the world record for snowfall in a season, it has interesting glaciers and wild weather. Though Baker is usually climbed by the Easton or Coleman/Demming routes, the Squak glacier offers an interesting alternative route or alternative approach to the Easton route. It is a popular ski route as well as a climbing route.
Notes:
- You can view all of my photos for this climb, as well as all of Jen's photos.
- You can also view our gear list from the climb, with my comments
- You can read the route descriptions for the Squak glacier route and the Easton glacier route on Summitpost.org
- The Forest Service does not require a permit for climbing Mount Baker; however, they do require a Northwest Forest Pass. They also maintain a page with current climbing conditions.
There are many times in one's life where things both work out well and don't work out well. This was one such time. The route was beautiful, challenging, complex, and ultimately one of the most rewarding things I've done in my life. The following account intermixes both trip report and personal account. I hope the trip report is helpful; I hope the personal account comes off as honestly as I intended. I felt I could not write one without the other.
Jen Hopper and I had been planning a trip to the Cascades for a while. She had been too busy to look at options, and so at the last minute I proposed the Squak on Baker which I had done a couple of times in June a few years ago. I remembered it as a slightly steep but enjoyable glacier climb, and given Jen's extensive experience on glaciers (Denali, Rainier, South America) I felt it would be a good fit for both of us.
We met at SeaTac and loaded our climbing gear into a rental car and headed off. We purchased bamboo stakes for making climbing wands at a garden store on the way to Seattle for $9 for 50 stakes, a worthwile detour. Then we stopped by the Flagship REI (not recommended for a quick stop as Seattle is rather busy - maybe try Renton instead) for fuel and maps and a few other odds and ends.
On the way to the trailhead, we stopped by the ranger station on Hwy 20 to pick up blue bags and sign a voluntary climbing register before continuing on to the Baker Lake Road turnoff. There are a number of campgrounds near Baker Lake which allow walk-in registration and we easily found a spot for the night.
The next day (July 23) dawned rainy and cold (54 deg F). Jen, being anxious about packing, got me up earlier than I would have liked, and her anxiousness and my tiredness set the tone for the day and perhaps the trip. We packed, drove to the Scott Paul trailhead, and started walking with our heavy packs. After negotiating a few downed trees, the snow began in earnest at about 4500'. Visibility narrowed to less than 200', it started raining lightly, and we walked in a frustrating fog (both literally and metaphorically) generally north toward Crag's View. I set two wands and took a GPS track before we even reached the glacier.
At around 7pm, we reached the base of Crag's View (the View itself is a rocky outcrop; camp lies right below it) and set up our tent. Here is the tent below Crag's View; the photo was taken on the much clearer second day:
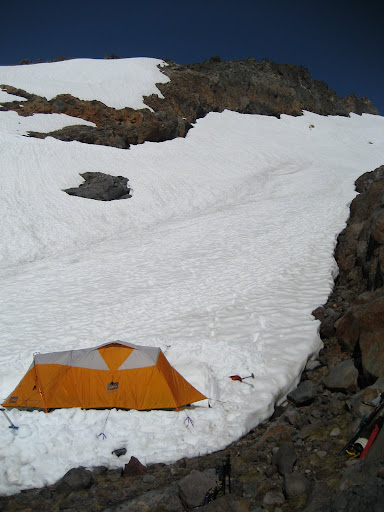
Our plan was to practice team arrest and rescue the next day, as this would be our first time mountaineering together despite our extensive experiences canyoneering together.
We heard reports that the mountain had not been freezing overnight (the freezing level had been above 10,000 feet for nearly a week before), but to actually see such a phenomenon in person was a weird experience. No ice, no crampons. Slush became the norm around 11am. At breakfast, the sun began baking the snow in earnest. I awoke early and watched a pair of skiers pass our camp and ascend onto the Squak. About 10am, we flaked out the rope to walk over to a practice site.
After the frustrating navigation and tone of the previous day I felt unsure about whether I wanted to continue climbing with Jen, and this second practice day didn't help. Despite her having much, much more time spent on glaciers than I did, she was unexpectedly unprepared. I found myself having explain how to keep the rope taut. I explained how to tie in. I explained how to set up prussiks. I explained two-person crevasse rescue.
The whole day, I felt this weird buzzing in my ears. Something seemed wrong, and of course sitting on my couch now writing this, I understand better. However, at the time, I was unable to reconcile the fact that Jen said she was ready to help actually lead the route and yet my eyes could see that the most basic elements of glacier team travel seemed completely new to her. It wasn't Jen's fault. It wasn't my fault. We are great canyoneering partners and great friends. But on the mountain, it was a total misunderstanding.
I'll say now that at that point, honestly, one of us should have seen that and we should have gone home. It was obvious that the two of us shouldn't have been climbing together. I'll be realistic: we were very, very lucky the whole summit day. With only a handful of experiences, I am fairly new to leading on glaciers, especially less-travelled glaciers where there is not a boot-pack to follow. And a new glacier leader, plus an inexperienced second in a two-person team, on a late-season and broken up slushy glacier was just asking for trouble.
But standing next to the Squak, being able to smell the cool wind coming off of it, I wanted so badly to be standing upon it. So we glossed over the details of practice, and I didn't press the issue. We came back to find Jen's food spread around by ravens, and we cooked dinner and packed and went to bed. I felt very angry and very scared and stayed up most of the night outside the tent on the rock ridge near us, watching the stars, and repeatedly looking at the map and the mountain in the darkness.
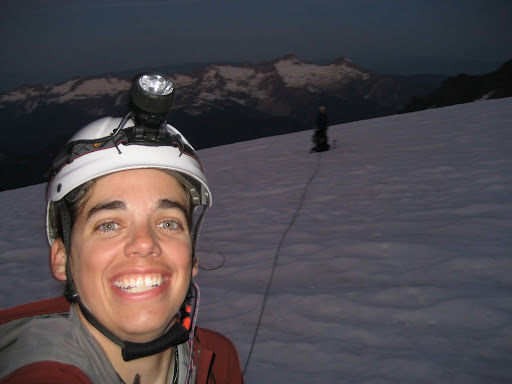
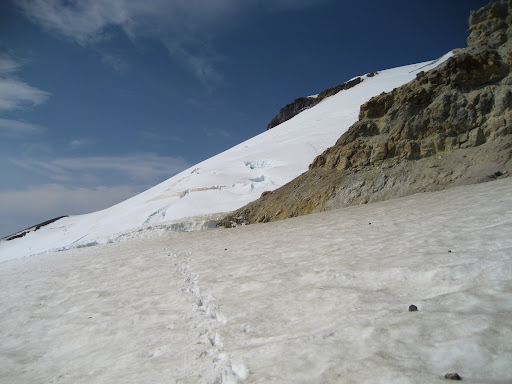
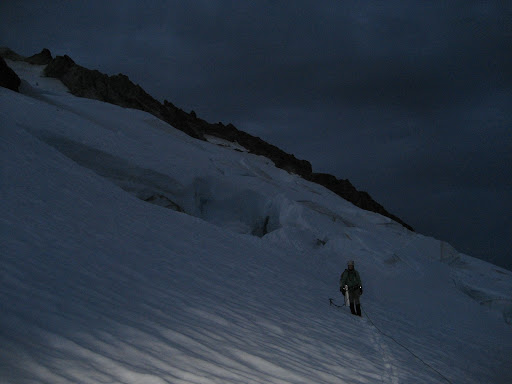
We awoke at midnight and began walking roped at 1am. I started a GPS track from camp; we carried the 48 wands remaining after placing two on the fogged approach. It felt good - wonderful, in fact - to be climbing in the dark on a vast expanse of snow. We easily gained the toe of the Squak via subtle ridges to the NE of Crag's View. I could hear the waterfalls torrenting out from the terminal moraine below us until we climbed high enough to hear nothing but wind and darkness. It was amazing to be on a glacier again: I was honestly and truly happy. Here we are spread out at a rest break:
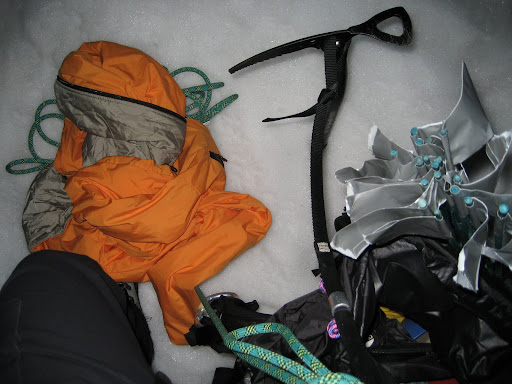
After the toe, I led up and northwest toward the connection between the Easton and Squak. The ski tracks from the previous day's skiers were sometimes visible, and sometimes not. The Squak nearest the rock between it and the Talum glacier was most broken up until about 8500', so I stayed more toward the Easton until that elevation. We crossed a few large crevasses on good snowbridges between 7800' and 8500'. My world was reduced to a rope, a mountain, and a small pile of gear. Here is my whole world spread out at a break:
At 8500', I faced a choice, I could lead left (west) onto the main body of the Squak, or right (east) of the rock prow sticking out about two-thirds of the way on the right (east) in the Squak. (If you aren't subscribed to Trails.com, use Lat/Lon 48.7597859, -121.8136712.) I was about to go left (where we would have found a huge unpassable crevasse, I found out later) but then I saw ski tracks to the right in the faint sunrise. So we went right.
It was obvious that the right-hand choice was very toothy and broken, maybe unpassable. The climbing angle was probably about 35-40 degrees from 8500' to 9100'. Due to the late season, there was more crevasse than snow continuum. The first snowbridge we crossed at 8500' was quite precarious, and because of the exposure above that crevasse (and the many subsequent crevasses) I placed pickets for the next 600 vertical feet. From my journal I wrote:
"I chose the right-hand option. And what a choice it was. Constant exposure, precarious snowbridges, enormous crevasses. And steep... One memorable bit of leading involved straddling a serac between two crevasses and humping my way over a hundred feet across the ridged top to rock on the other side. Jen called it 'riding the snow pony'. The crevasses on either side twisted in icy turmoil down into blackness - I called it petrifying."As with any late-season glacier, we walked more out of a straight line than in one, but the broken section in those 600' was especially non-direct. Most amazing to us were the signs of the skiers' passage the day before. That bit of the mountain demanded a lot: creative anchoring, patience, boldness, and - perhaps most demanding of all - three hours of our day.
At 9100', we popped out of the toothy body of the Squak and enjoyed a few hundred feet of relatively easy and uncrevassed climbing on the Easton. The relief of simply running uphill on snow was absolutely lovely! But at that point, I had been kicking steps for three thousand vertical feet of soft snow and had felt very in over my head leading the broken section of the Squak. And we hadn't even reached the Roman Wall.
We crossed another tenuous snow bridge to reach 'The Pooch', which is the bit of rock forming a saddle right to the side (west) of the fuming summit crater. Here, we could see the Roman wall looked very broken, especially on the climber's right side where we were. Here is a photo from before the Pooch:
Three huge crevasses nearly spanned its entire base, and more partially cracked its midsection. I enjoyed a few hundred feet more of unbelayed climbing before again committing to setting picket after picket.
I weaved back and forth across the upper sections, trying to subtly follow less steep ridges (drifts and folds in the glacier) to minimize the chance of a fall in the very soft snow and our exposed position. Also from my journal:
"With the snow as soft as it was, many of our protection options were non-ideal and step kicking was very strenuous.... Our 11:00 am turnaround time came and went. Jen wanted to push on, seeing as we were 'so close' (we weren't) and I didn't care. The climbing was beautiful, and honestly, I think continuing upwards was much easier mentally than to think about leading back down all that scary and sketchy crap on the Squak that I'd led up..."Regardless, when we finally reached the summit, I remember not caring. I'd never felt that way about a mountain before. I'd always felt at least a little proud at the top of a mountain, but that time on Baker, I felt nothing about the summit at all.
Instead, all I could feel was how much my legs hurt after kicking 4500 vertical feet of steps (that is, it would have been 4500 feet if we had climbed straight up instead of weaving around crevasses) and how tired my arms were after pounding in all those pickets, and how much I didn't want to down climb all of those melting snowbridges. Jen insisted on taking a lot of photos. I felt like I was in a bad dream. The time was 1:00 pm. I think I said it best in my journal:
"When we finally reached the summit I didn't even care. My mind wasn't on top, it was off somewhere else, already working its way backwards down all those belays. It was so hot I could almost hear our snowbridges melting. I didn't feel halfway to anywhere. In fact, I felt like the hard and dangerous climbing was about to begin."Despite the stress, some things were going well. The climbing was gorgeous and pure. We had the mountain entirely to ourselves. Our 'per pitch' time (two rope team running belay lengths) got reduced to five minutes per pitch. And regardless of my trepidation of leading on a glacier, with the intermittent help of the ski tracks, I had successfully found a route to the top. Now all we had to do was get home.
The downclimb of the Roman Wall was a blur. More belays. Plunge stepping. Jumping two crevasses that had opened up. We reached the Pooch, and the snowbridge there had fallen in. I climbed into the crevasse and tentatively touched the collaped blocks. Solid, at least for the time I could scramble across and out.
After some debate about traversing all the way across the Easton to find an alternate descent to the toothy part of the Squak, I made perhaps my most autocratic decision of the day to downclimb the Squak. I didn't want any more glacier routefinding that day, especially routefinding downhill on a new route in the heat of the afternoon.
I thought of beta we had gotten from the rangers before leaving - that the primary snowbridge on the Easton was about to collapse. I had visions of wandering around on the Easton for hours, failing to find an alternate descent, and then me having to lead down the Squak in the dark. That decided it: the Squak would go in reverse, or we would bivy.
I led back across the 'white pony' serac (now slush), losing a carabiner into the depths of a crevasse. I led down around all the snowbridges that had thinned and shrunk during the day, belaying the whole time. Then, to my disappointment (but not surprise), the snow bridge at 8500' had collapsed. It was the only thing that stood between us and the relative ease of of the lower 2000' of the Squak.
So I led down and around an alternate route, much steeper, using up all of our protection and having Jen re-tie 20' down the rope from the slack in her pack (while I was mid-pitch!) and anchoring off my tools at the end. Yikes!
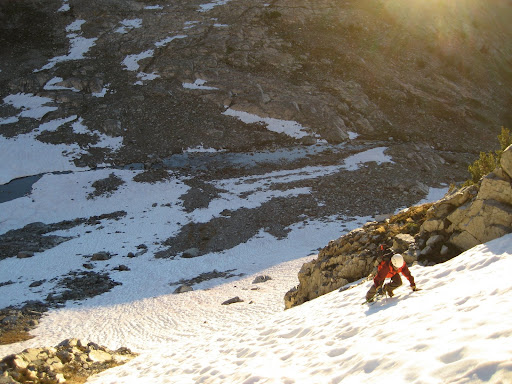
We exited the technical section of the Squak at around 9pm. Jen dug around in her pack for her headlamp, and ended up dumping her rain jacket in a crevasse. I threw up out of relief while waiting for her: the hard climbing was over. Here is a picuture of the lower toothy part of the Squak as we exited:
The GPS enabled us to pick up all of the approximately 35 wands we'd placed on the glacier. However, that infernally weird piece of equipment mis-placed our track by a MILE at one point, which I followed for a full 300 feet before realizing it didn't feel right. I struggled to keep focus as I looked for our footprints and our wands, kept a lookout for crevasses, kept slack out of the rope from the bottom, and followed what help the GPS could offer.
We arrived at camp at 1:00am (24 hours after leaving), re-pitched the tent, ate food, and crawled into our sleeping bags to awake at 6pm that evening. I awoke once to chase ravens away - they had figured out how to open the toggle on my stuff sack even under a pile of heavy rocks. We ate again, and went back to sleep. It rained all night, but we were actually in a pretty upbeat mood after making it back to camp safe and sound and with nothing worse than some dehydration and sore muscles. The next day I wrote in my journal:
"Jen freely admitted that it was the hardest climb she'd done. I sorted through my mixed and tangled emotions to realize that it was the hardest climb I'd done too, much less unintentionally and near-unwillingly guided, and all things considered I was pretty proud....I learned how far I can push myself, which actually felt great! I was so scared the night before, and the entire summit day...and I'll say most of it was luck but some of it was hard work and pulling through."We packed up and started hiking down in low visibility again, marveling at how lucky we were to have good weather for the summit. The snow had melted considerably during the days we were up there, easing the task of finding the trail. We reached the trailhead in early afternoon in the rain. Jen and I did it. I still don't know whether it was worth it, but I have rarely felt so lucky or grateful in my life.
Mount Baker Gear List
Used on the Squak Glacier Route
July 23-27, 2008
To help those folks planning their trip, here is what we took, and what I thought about it. Keep in mind that this route is also done as a day ski trip by skiers much stronger than myself; this list is for climbing.
Non-Technical
- Backpack - Big for the hike in and yet good for stripping down and climbing with.
- Tent - We debated between a 'mid and a "three person four season" tent. Without a ground tarp for both of us, we chose the tent. Heavy, but worth it.
- Pad - Warm
- Sleeping Bag - Synthetic. I used a down inner bag and synthetic overbag from MEC, a system which I've used in the past with a lot of success. Jen brought a down bag which just got flatter and flatter; Baker is pretty wet.
- Warm Clothing - Synthetic, with a bivy option. I brought two synthetic insulated jackets, and used them. I love the Wild Things jackets. It didn't freeze on the mountain when we were there, but it came close.
- Boots - Both Jen and I brought double plastic boots, we probably would have been fine in single waterproof mountaineering boots.
- Waterproof Clothing - A must. However, I climbed in softshells the whole time and stayed pretty dry.
- Sunhat, sunglasses, sunscreen - It's a white, bright world out there.
- Bivy Tent (Bothy Bag) - I use the OR Lighthaven during the winter for getting out of blowing snow during the day. It weighs about a pound and holds two.
- Headlamp - Something bright. I used the Black Diamond Soliras, too bad they don't make it anymore, it rocks.
- Gloves - I brought three pairs and was glad I had an extra dry pair always stowed.
- Regular Clothing - Socks, long-sleeved light colored shirt for staying cool on the glacier, underwear, softshell pants
- Knife - Useful for cutting cheese
- Food - 3,000 calories a day plus two extra days for weather. We should have brought more stuff sacks for raven protection, to double the stuff sacks so there are no holes at the opening.
- Water Container - Four liters capacity minimum. We drank 3-4 apiece on summit day and it still wasn't enough. I use my MSR Drom.
- Stove and Fuel - The MSR Reactor simply dominates in cold, windy conditions. No contest with any other stove in terms of performance for the weight.
- Map, Altimeter, and Compass - Should be obvious.
- SPOT messenger - Useful for letting our emergency contact know that we're OK
- Poop bags - I find the blue bags offered by the forest service somewhat lacking. I prefer the wag bags that you can get at REI or the like - well worth the $2 to reduce the smell and leakiness, in my opinion.
- Shovel - Tent platform leveler, snow cave creater, snow transporter for melting into water.
- Rope - We used a 50m 8.9 (?) mm half rope. Worked great for two people with 80-100' spacing.
- Tools - One axe and one tool apiece. The tools were mostly used for anchoring, and I also bring mine to use in my crevasse rescue system.
- Pickets - We brought four as a team, with a sling or cable and carabiner for each one. I wish I had brought like eight. I love the Yates pickets with the cables. I hate the MSR pickets.
- Transceiver and probe - Just in case, though more probably we would have been swept into a crevasse with how open the glacier was. But avalanche conditions were being reported as active until early July, so we brought them.
- Screws - Four, just in case. Probably would have needed them anywhere other than the surface snow.
- Crampons - Used briefly for better traction. The snow was overall soft.
- Helmet - A must.
- Crevasse rescue equipment - I brought four lockers, three slings, a measured texas prussik setup, and two ovals. Plus about 17' of 7mm cord to chop up if needed. I would have liked two more lockers. We used prussiks on the changeover for running belays, which were fast but less ideal than a belay device.
- Harness - light and fast.
- Wands - Brought 50, used about two thirds. We would have used more if the route wasn't simply obvious (i.e. the only way you could go between tightly broken crevasses) for much of the climb.
- GPS - Usually not in technical gear, but now I think it deserves to be. I am usually against GPSes, but they have admittedly saved me a lot of frustration when things are still doable with a compass but take longer.
Saturday, July 12, 2008
Moving Stuff To Canada
You'd Think It Would Be Easier
Here is the challenge: Get me, about 1000 pounds of stuff (just stuff, no furniture), and our Ford Explorer moved from the United States up to Canada. Yes, Canada. If this were a move within the States, it apparently would be easier - no shipping duties, no barriers to one-way moving truck rentals, no dealing with 'international' moving companies. For crying out loud, Calgary is like 200 linear land miles north of Montana. So close.... and yet so far.
But, I know it will be well worth the effort in the long run since it involves.. (yes, you guessed it)... moving to Canada. So this is a documentation of what we tried, and what we ended up choosing and why. How would you do it? For Roy and I, we didn't have a clue. But soon enough, we would....
Here are the options we came up with:
Option One
Go For Broke: Use A Real Moving Company
The plan: Give my email address away willy-nilly to spammers by asking for free quotes from various moving companies. International moving companies, that is. Yes, those companies who also rent space on freight boats to move folks to New Zealand. A little overkill for Calgary, if you ask me, but that's life.
The results:
- Quotes ranged from $2200 - $2700 for 200 cubic feet of space (for full service moving)
- Add on top of that about $150 for crossing the border
- Add on top of that tip, plus the little costs they never say (like a 'surcharge gas pumping fee'...)
Disadvantages include some minor, yet important, points: I won't be with my stuff at the border (which makes me nervous), I don't know the distribution of the 200 cubic feet they'll give me (1 x 1 x 200 feet?), and insuring the stuff whilst being moved is extra.
Not to mention that I got automated calls from moving companies every day for a week. I mean really, do you actually think I'll call you back if you call me with an automated message with no information other than to call you back? Anyway, this inspired me to have a bit more control over my stuff, which led to the idea of simply taking it all with me....
Option Two
Drive North at 55mph: Cargo Truck Rental with Towing
The plan: Rent a moving truck, and tow the Ford behind it.
The results: After many company inquiries, this didn't seem to be the best option. Here are the major companies I contacted and their answers:
- Uhaul: Ford Explorer 'too heavy' to tow.
- Penske: Great Customer Service, said Ford Explorer can be towed, but truck needs to be returned in the USA (adds about 16 hours of driving)
- Budget: No inter-USA/Canada moves
- Ryder: No one-way moves
Option Three
Kill Your Gas Mileage: Trailer Rental
The plan: Rent a trailer (one way) to tow all my stuff behind the Ford.
The results: The only place I found to rent a trailer one way is Uhaul, and they have a vendetta against Ford Explorers. Feh. At any rate, ten days of trailer rental would almost cost as much as buying a utility trailer, which led to the idea of....
Option Four
Kill Your Gas Mileage And Your Driveway: Trailer Purchase
The plan: Buy a trailer here to fit all my stuff, tow it up there, sell it up there.
The results: The best place to look for trailers seemed to be Craigslist. There are a few new trailer dealers in the area such as Carson Trailers, but there are few better ways to see what people buy than to see what they sell. Here's what I found from a couple of times of searching:
- Quality open utility trailers (to hold about 200 cu feet or more) run $700-$2000, but then my stuff is open to theivery.
- Quality closed locking trailers (to hold about 200 cu feet or more) run $2000+
The main thing is that then I'd have a trailer to deal with. Licenscing down here, selling up there, what a headache! It would be pretty cool to own a trailer though...just think of all the stuff I could haul around with it, eh?
But not to be deterred, I examined this option to its fullest. I found a place north of Calgary where I could store the trailer when I arrived. I also contacted the Alberta Ministry of Transportation via email to inquire about the importing and selling of a trailer. They got back to me in (no kidding) four hours with the following:
Trailers that are brought into Canada must have a completed Vehicle Import Form (Form 1) and proof of ownership (such as a US title) to cross the border. Please see the Registrar of Imported vehicles website at www.riv.ca for more detailed information.Not too bad, but yet another thing to be done. Plus the purchase of a ball mount and a ball (we already have a 2 inch box hitch on the Ford), making sure the electrical connections work (knowing our Ford that may involve more than just a plug), and then actually driving the thing 2200 miles... you can see how this option gets pretty complicated. So I thought maybe I just want to ship everything and be done....
To sell a vehicle in Alberta, the owner must complete a bill of sale transferring ownership to the buyer, and the buyer would then use that document as their proof of ownership. Bill of sale forms are available on the Motor Vehicles website at http://www.servicealberta.ca/596.cfm
If you are not going to be keeping and using the trailer in Alberta, it does not need to be plated, however if it has no plates it may not be on any public roadways, it must be parked/stored only on private property, such as in a yard or in a private driveway.
Option Five
Give My Stuff The Roughhouse: Shipping
The plan: Drive with bikes, fragile stuff, and other heavy items, ship everything else.
The results: At first, this seemed pretty good. After all, it basically involves packing it up.... and off it goes. Sort of like full-service moving, only hopefully cheaper. However, asking Dan, my new and never-before-seen roommate, to put 1000 pounds of stuff in my room for me is not the best first impression.
But, an option is an option, so it got investigated.
I figure as a conservative estimate (i.e. guessing high) that I would need 20 boxes at 50 pounds each. Here are the estimates from each of the companies I tried:
- DHL: 2 x 10 packages at 50 lbs = 2 x $2090 = $4180 (Yikes!)
- UPS: $990 (20 packages at 1000 lbs total)
- FedEx: For the life of me, I couldn't get their site to work for large boxes. They'd transfer me to the 'freight' section of their site, and it would break.
- USPS: 20 x $90 per box = $1800
So I kept it in mind until the 200 cubic feet measurement appeared as a standard moving capacity quote. Then I kept the weight the same, but I tried again with actually putting in box sizes rather than just weights (2ft x 2ft x 2.5ft apiece) to approximate the volume on UPS. Then...lo and behold, UPS wanted to charge me a size differential cost which bumped the price up to... (you guessed it) $1800.
The Bottom Line
I hope that this summary will help others going through the same thing. Everyone has their own reasons for choices, and hence the reason I posted every option in-depth.
But we're probably going to choose the purchase-a-trailer option. I will update this post as we continue to refine our plan. Wish us luck!
Monday, July 7, 2008
Mount Ritter Via Southeast Glacier
July 3-6, 2008
What a Way to Celebrate July 4th
Trip Stats:
- Distance: About 14 miles on trail, 5 miles off trail and scrambling (roundtrip)
- Elevation gain: About 5,000 feet (the trail starts at 8,400', then descends to 8,000' and Ritter lies at 13,150')
- Time: One day to Ediza lake camp and another day departing, plus 13.5 hours roundtrip to summit (for us)
- Trail and Trailhead: Agnew Meadows trailhead to Shadow Lake Trail (Permit information and dates with filled reservations)
- Difficulties: Moderate (35 degree) snow, third class loose rock in a tight chute
- Highlights: Being on top of the tallest mountain around, a quite fun route!
Overview:
Visible from Hwy 395, the top of Mammoth Mountain, and other surrounding areas, the peaks of Ritter, Banner, and the Minarets hold the attention of mountaineers like very few other summits in the Sierra. Much less sustained than the 3rd class of the North Face, the Southeast glacier route on Mount Ritter offers varied and relatively solid scrambling.
Description
It being July 4th weekend, we were only able to get permits for 6 people to start July 3rd. Roy could only leave at noon, so that meant that we would be hiking to Ediza Lake in the dark. Sort of silly, but also sort of fun. Unluckily, one of our crew, Adam, had his car towed that morning and wouldn't be arriving until at least 10pm (we started walking at 9pm) so he and Jen Hopper opted to get a walk-in permit the next day.
After the mandatory shuttle down to Agnew Meadows stopped at 8pm, we could simply drive down into the valley with our own cars. So at 9pm, Jeff, Roy, Brandon, and I started out on the Shadow Lake trail toward Lake Ediza. Though easy to follow in the daytime, the trail has a few forks that require attention in the dark. (A lesson Roy and I learned the hard way a few years ago.)
At around 1am, we successfully arrived at the south shore of Lake Ediza, and, after heartily scouting our options, found that our best way across to the campsites in the trees on the east side of the lake was to... ford the freezing cold river feeding into the lake. We shed boots and socks, plunged in up to our knees, oohed-and-owwed our way across, crawled up the opposite bank, and enjoyed the 'invigorating' numbness of our feet and ankles. And so was the flavor of the trip begun. We were in our tents a bit after 2:30 am.
The next morning we slept in and lazily put off 'snow school' for Brandon and Jeff until 3pm. Of course, in the daylight, we found a slightly easier way across the river we had forded that morning. We dubbed the new crossing 'the leap of faith'. At least it didn't involve taking boots off.
And after step kicking, self arresting, and cramponing on a measly little snowfield south of camp, Jen and Adam appeared. They had gotten the last two walk-in permits and showed up in time for dinner on July 4th. We all returned to our basecamp on the west shore of Ediza. Dinner followed, with a cake in celebration of Adam's birthday, then early to bed.
We arose for a 4am departure. Jen and Adam opted out of the climb that morning, as they wanted to sleep in and practice locally for their climb of Mount Humphreys the next weekend. So Jeff, Brandon, Roy and I were again hiking together in the dark. Here is Ritter arising in the near-dawn:

It began to get light as we reached the cliff bands below the Southeast Glacier. Despite the lack of snow at camp, the bowl between the Ritter-Banner saddle and the south flanks of Ritter was still fairly well snow covered. This meant we faced snow climbing on the cliffs below the glacier, and a bit of patchy 2nd class rock in crampons. (In later season when the snow melts, these cliffs are class 3 rock.) Here is Roy on the first part of the still-frozen morning snow as the sun rose:
We finally gained the bowl a bit to the east of the toe of the glacier. The bowl (I believe it is listed as the 'Clyde variation' to the SE glacier direct) then leads easily to the toe of the SE glacier on either snow or (as we opted for) ledges on rock bands.
Once on the glacier, the route is pretty easy for a while - walk up the low-angle base of the glacier until the end of it on climber's right. Then, a number of chutes (and cairns) present themselves to continue on rock.
When ascending, we found a nearly-all second class rock route to the saddle south of Ritter's summit. It followed ledges on a subtle rib between the well-cairned chute to climber's right, and the loose scree to climber's left.
Once below the saddle south of the summit, the snow was soft enough to kick steps, so we left the crampons off and continued on snow and rock to the top. Having fun despite (or rather because of) the altitude, we called the continual effort of climbing 'kicking the pig'. The alternate meanings for that saying got worse and worse (better and better) as the day wore on. At long last, we were on the summit at 10:45 am, the pig having been well kicked. Here is our goofy summit shot, Roy on left, Jeff in the middle, Brandon on the right:

Here is my self-portrait on the summit:
After glissading down the snow and hopping down the rock back to the chutes just below the saddle, some debate ensued as to where we came up from the glacier. In the end, we opted for the well-cairned gully we had avoided on the way up. The new gully ended up having more class 3 and looser rock than our ascent route. Thus, it took longer to get down since we moved one at a time through the loose rock sections. Here is Jeff entering one of the short class 3 spots:

After escaping the tight gully, we ignored the 'cairn gnomes' and proceeded down the wide talus field to the glacier. Here are Jeff and Roy looking small against the talus and snow below:

Down the glacier we went, then all the way back across the bowl toward the east before descending the snowy cliffs from the morning. Both Jeff and Brandon enjoyed working on their newfound snow skills, so they descended one at a time and kicked their own steps. A fun way to end the climb.
We descended on trail back to Ediza lake, into the heat and the mosquitoes. Jen and Adam excitedly returned from practicing on Volcanic Ridge to the south of Ediza. We swapped stories and were happy to hear everyone had a great day. Then we all had dinner and flopped into bed.
The next day, we slept in, packed up, and hiked out in the afternoon heat. The four of us who had hiked in the coolness of the dark at the beginning of the trip marveled at how well that worked out as we sweated back up to the Agnew Meadows trailhead. At the cars, we packed up, hugged each other, and departed. What a great trip.
If you like, you can see all of my photos from this trip. Congratulations to Jeff and Brandon on their first Sierra peak, and as always, thank you to Roy, the love of my life, for sharing this adventure with me.
Tuesday, July 1, 2008
Me, On A Mountain Bike
Heading Out On A New Trail
Well, it happened. After staying a pure road cyclist for years and years, it was time to purchase a bike for Calgary. (After all, I figure my squirrely road bike will be good on about 20% of the terrain/roads/paths up there for about 25% of the year.)
A bike for, you know, commuting. Commuting: the desire to be free and go everywhere on your bicycle. Every college student's dream (some successfully, many not), and oddly one I've had every time I head off to a new degree or job - seemingly without learning from the last time. Though to my credit, despite my continued use of the bus rather than a bike to actually go places, I still love riding (or 'tearing up some pavement') for plain old fun.
So this time, I may have done something right. I said "How much do I want to spend?" My intuitive answer: Somewhere around $250. But then you play that game (you know, that game) with yourself. It goes something like this... A little voice in your head says, "Hey, for $20 more, you can get a Shimano name brand rear derailleur", and then "And hey, if you spend $30 more, you can get front shocks!" Then disc brakes, then recognizable brand tires, and soon you're looking at bikes worth $500 and wondering what happened.
So there I was, playing that game, ready to take the dive. After all, if I was getting a commuting bike, why not get one that I can also mountain bike on? Who knows, I might actually like mountain biking....all the other skiers in the world seem to. Generously, Roy's parents offered to help me with the bike for my birthday, so that bumped me out of the commuting-only category. And it only left the question of what to get, and where to get it.
I looked around (they need a name for the intense Internet scouring fervor that comes with trying to research every bike - or what have you - in the world without actually setting foot in a store) and found a few good options. I spent a number of hours of my life on MTBR, reading their reviews. I looked at bikes from REI, Performance, Helens, and some online stores.
And finally, I played the most controversial game of all: Not wanting to spend $500 for a $500 bike. (Yes, that game.)
More fervored Internet scouring. More spec comparisons. Finally, I purchased a Windsor Cliff 4500 from Bikesdirect.com. Before you start letting your mind go off on some tangent about what you think of buying unseen, unridden, unreviewed bikes, let me tell you that my ordering of the bike was not without some small amount of panic. No amount of Internet scouring could appease me, pre-order, that either bike or vendor were not going to blow up and disappear respectively as soon as I ordered one. But everyone has their reasons for eventually making such a choice, and I had mine, which are probably best left for 'an evening and a pint', rather than being told here.
Regardless, some people call the Cliff 4500 a 'mixed' bike. That is, some name-brand components are on the bike to bump the price up, but some components are pretty cheap. Truth be told, I really don't care. It was $350 total with Rockshox and disc brakes. I bought my Raleigh 600 road bike (which I love) many years ago under similar circumstances (as stock, with very mixed Shimano components, and some no-name components) and have slowly replaced components as I want to, rather than paying a huge amount of $ up front. Plus, cheap handlebars still work pretty darn well until I grow my skills enough to want something different.
Regardless, the order process from Bikesdirect was pretty basic: I paid, and 24 hours later I got a UPS tracking number in a generic thank-you email. The next Monday, on time, the bike showed up at my door, lying on the side that says "Do Not Lay On This Side" in huge bold letters on the box. I signed for it, cringed as various metallic components could be heard clanging inside as I brought the bike in, and ripped open the cardboard. Here's what I found - basically a very compact bike in pieces:
And, truth be told, the bike was just fine. There was one paint scratch behind the top of the front fork. But aesthetics aside, the excellent packing job had the bike in 99.9% perfect condition on arrival, more than I expected. (The clanging was the pedals, packaged in a cardboard box of their own.) Here is another picture of the bike once extracted from the box:
There are a few things that I feel I should mention. First, their website does not describe everything that needs to be done to assemble a bike when you take it out of the box. I needed to do the following:
- Remove bike from extensive packaging and find all the pieces and components in the box
- Put the quick-release shaft through the front tire, and the front tire on the bike fork
- Put the saddle and seatpost unit on to the bike (using the provided quick release lever, a nice touch)
- Put the chain on the front gear ring
- Put the pedals on (needed 15mm wrench)
- Put the stem on the headset, and tighten appropriately (their instructions are wrong - they just say to tighten the stem expander bolt, which won't work, you also need to tighten around the headset, needed a hex key for this)
- Rotate the handlebars in the stem (they were put on upside down at the factory, again, needed a hex key)
- Install the front brake on the frame (need hex key, cable cutters for trimming the brake cable, and a crimper to finish the cable off)
- Align the pads on the front and rear brakes (need hex key, and some knowledge about disc brakes, which I spent about 10 minutes with the included documentation getting)
- Tune the deraileurs (Mine needed minor tuning only with the finger screw)
- True the wheels (I've not done this yet, they're decently trued for test riding anyway)
Then, the 'how to put your bike together' instruction booklet that they send is worse than useless: sometimes it's just flat-out wrong. The book I learned maintenance for my road bikes from is Zinn and the Art of Road Bike Maintenance, and I'm sure his mountain biking version is also great, though I don't own it (yet). However, Bikesdirect does send every pamphlet that goes with every component, and those are actually pretty darn useful. Here is the spread of paperwork that came with the bike:

I also put on some pedal clips, as well as the usual additives (pump, seatbag, etc). After assembling, I took the bike for a couple of spins around the block, getting the seat height right and fine-tuning the shifter cables.
And then, the next morning, I took the bike out for an actual ride! It was my first real mountain bike ride of my life. I went down Crags Road in Malibu Creek State Park, down to the M.A.S.H. site and beyond. I wouldn't call the trail a beginner's trail (I had to get off and walk for about a half mile on a really rocky and skinny trail part). Perhaps I was following a side trail? At any rate, I sure enjoyed it for my first ride.
Here is my bike and an old rusty prop car from the M.A.S.H. show: old machine and new machine together:

And a closeup of the bike, since that's probably what you really want to see:

The bike handled really well, and so all in all I consider the whole adventure of finding a mountain bike to be a success. In my internet scouring, I came across some words from a GORP article:
If this is your first mountain bike ever, which it sounds like, it really isn't going to make much difference which frame you go with. You'll fall in love with what you get used to, providing you're happy with it from the start.And boy, did I have fun! I can see why skiers like this sport: it's techy, strenuous, interesting, and yet very accessible. Who knows where this bike will take me next?
Friday, June 27, 2008
Climbing Rope Rug
How to Make Your Old Climbing Rope Into Furniture:
Seven Hours of 'Art' on a Saturday
Well, I've made my fifth (?) rope rug out of an old climbing rope, this one out of a length of 100 feet of half-inch static line.
Making a rope rug somehow seems to be an envious skill, but I don't think it demands all that much talent, just patience (and not much of that either). Still, Roy walked in and commented that he hopes everyone I give them to knows what a supreme act of love the making of a rope rug for them is. Sure, I'll take that, but half a Saturday is also not much to give for a cool rug and a nice gift.
There are many ways to make a rope rug or rope mat, as well as a few good instructions out there on how to do it. The more complex square pattern of a rope 'mat' can be seen, complete with instructions, on Summitpost.com. There are of course other spinoffs, either professionally made or otherwise - some examples and discussion can be seen here (plus an old mosaic) and here, with a whole variety of designs.
The easiest way to make a rug would be the spiral rug, either taped on the bottom, or sewn into the spiral. These form cool mats as well, and can be seen on the discussion board posts above.
Other possible designs are outlined in knot books - as pointed out by Tradgirl - or by ornamental knot patterns found online or elsewhere, because in the end rope rugs are just big beautiful knots.
My knot of choice for making a rope rug is the Prolong Knot. Here are a few reasons:
- It makes elongated mats that are good for putting in front of doors, desks, etc
- It has a low 'weave-to-length' ration (i.e. I have to go over and under less per rug than other woven designs - what can I say, I'm lazy)
- The design can be extended or shortened for differing rope lengths and widths
- Detailed instructions are available online in PDF format
- Other online instructions are readily available
But of course there are a few disadvantages:
- The rug loops at the edges aren't glued or sewn so they can get mussed when moving the rug. This will happen for any woven rug, but less weaving = more room for looseness.
- As with any weave (as opposed to a spiral) it's not so obvious what to do with the ends (in reality, you just weave them in so they end up underneath).

The black rope served me and others well as a rigging (anchor) rope for many years, but it is getting quite old (more than ten years, I forget the actual amount) and I never bring it with me anymore because it is so...darn...heavy! But since it is still in okay shape after all that abuse, I'm sure it will be a fine taker of foot traffic for years to come.
For comparison, you can view a rug I made a while ago, out of a 10.2mm 50m dynamic rope. You can note that it's much longer (six loops on the side instead of three):

The black mark on the orange rug was the middle marker on the rope.
All in all, if you're just starting to make rope rugs, be patient. If you do the same pattern more than once, it gets easier and faster every time.
Over time, I've even learned to wear gloves to prevent rope burn as I pull the rope through the weavings, and to sit on the already woven parts of the mat to prevent them from being tugged out of shape as I work. You'll probably discover your own tips, and having your silent partner be always at the foot of your bed after so many adventures is well worth the effort!
Sunday, June 22, 2008
Vasquez Creek Canyon
June 21, 2008
Fun Summer Day Canyoneering Adventure
Trip Stats:
Roundtrip Distance: About 5 miles
Start/End: Vogel Flat Road (East Picnic Area) off Big Tujunga Rd
Gain/Loss: 900ft / 275m
Time: 7 hours (for us)
Difficulties: 5 rappels, some downclimbing and awkward tree 'scrumbling',
Other Information: Chris Brennen's Writeup
Overview:
Though Chris Brennan gives this canyon only two stars, this canyon shines in the summer when its shade and water are welcoming on the hottest days. It isn't as 'clean' as some of the super-classics like Rubio or LSA (i.e. there are lots of downed trees, etc), but with the interesting basic problem solving, overhanging sides with beautiful dripping hanging fern gardens, and clear water (this canyon does not seem to be a pond scum farm due to its shady nature), Vasquez canyon has a charm all its own.
Canyon Description:
After some missed turns in the car we found the parking lot and packed up. For reference, Big Tujunga Road is located off the 210 Freeway by taking the Sunland Ave exit in Sunland, heading East on Foothill Blvd (Foothill = the other name for Sunland Ave) until Oro Vista Ave, and then taking Oro Vista North until it turns into Big Tujunga.
The trails in Chris's description were in good shape, though in the past they sometimes haven't been, due to overgrowth and flood. This time, we were lucky to follow the trail all the way up the Big Tujunga, up the ridge, and to the fir grove just West of the canyon drop-in. To my surprise, the Big Tujunga was dry, dry, dry! Also, the heat was quite oppressive in the morning on the ridge hike up, despite the intermittent shade and our relatively early start.
But once in the canyon (someone has placed a large cairn near the drop-in entrance), shade and a small trickle of water greeted us....relief.
- At the first drop (~10ft) we downclimbed the hollow downed tree that has been stationed there for many years - very neat in higher water when the flow goes through the tree itself!
- At the awkward second drop (~10ft) we set up a handline on the very large fallen and forked oak log that has been more recently placed there.
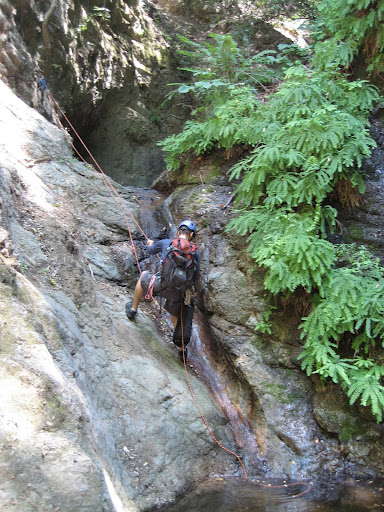
- After a bit more scrambling, we came to the first rappel (~30 ft). I've not solved this rappel the same way twice - sometimes having a wedged log to tie off, sometimes scrambling up a loose and exposed slope to canyon right to a tree, but this time we found neither log nor safe access to said tree. Thus, we made a rockpile in the streambed, tied off the back rock, and used that. Probably the most interesting problem of the day.
- Immediately after, we came to the second rappel, off of a dead but still well-rooted tree on canyon right. This rappel was shorter (~12 ft) and easier to set up, a relief after the rock pile. Here is Keith on the rappel:
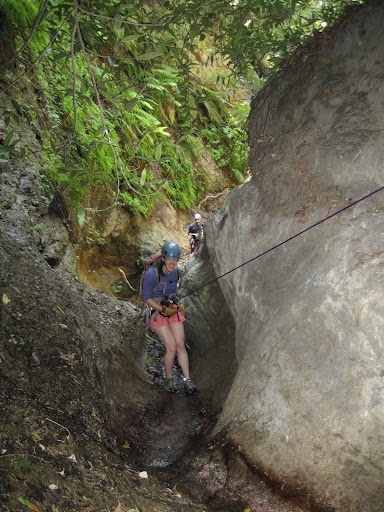
- Some more boulder hopping and under-tree ducking brought us to the third rappel (~30 ft) which was anchored off of tree roots to the right (very cool). Here is Kristie heading down:
- The canyon then relents in this steepness for a little while but various short downclimbs under and over large trees continued
- Finally, the double rappel at the end of the canyon appeared. The first of the two rappels goes down about 15 ft, into a short, water filled pool, and then down another seven or so feet to the top of the last rappel. The last rappel (~70 ft) anchors off a tree on canyon left. Here is a view from the top of the last rappel:

This canyon changes a lot over time. With the exception of the last two rappels, I remember all the other rappels each being variously downclimbable due to treefall piles in the right places, but at other times (like this one) all are rappels.
In addition, the first rappel anchor changes with the fickleness of the latest flood. Huge logs, rockfall, and other features change position much more than I've seen in other canyons. Odd, as this canyon is not scraped clean from obvious flashing.
Overall, a great day. In addition to those above, you can view all six photos from the trip. Thanks to Kristie and Keith, this was my first canyon I did with them, and it was fun.
Tuesday, June 17, 2008
Unpacking the Rae Lakes Gear Plan
20-20 Hindsight With Comments
The original reason I posted my planned gear list for my Rae Lakes trip was so that I could review the gear setup (rather than just individual items) upon my return. So, here I am.
For each bit of my copied-over gear list below, I'll use one of three probably-self-explanatory comments, along with some plain old-fashioned English description:
- Yay - worked great, would have been much less happy without that specific piece
- OK - did its job, could probably have gone with anything of similar function
- Boo - wouldn't have brought it, or would have brought a different item of similar function
Gear List:
___ Cilogear 60L Pack (68 oz) - Yay! Incredibly enough, despite the thin straps and climbing-oriented build, this pack kept me relatively comfortable. And I loved the clip-off lid for taking into my tent at night.
___ Black Diamond HiLight Tent (50 oz) - Yay! The weight of a bivy, for the palatial space of a two-person tent. However, the inside-setup poles and the big front door conspire together to let precipitation in (yes, inside) the tent while setting up in a storm. Not much, but some.
___ REI Kilo Plus Sleeping Bag and Outdoor Research Dry Stuff Sack (48 oz) - OK... I missed my stretchy sleeping bags (Montbell) for comfort (and less weight) on the longer trip
___ Garcia Machine Bear Canister (44 oz) - Yay! I can't believe I'm saying yay to a bear canister. I hate bringing these things. But it gave me the flexibility to camp where ever I liked, including away from the bear boxes, and some bear boxes were broken in early season. Plus, doing a food hang solo isn't much fun.
___ Emergency Kit (first aid kit, repair, survival) (22 oz) - Yay! The gauze actually got used to cover my poison oak on my elbow the whole trip. Thank goodness I packed cloth gauze - I needed to boil the old dressings to re-apply them.
___ MSR Reactor and lexan spoon (21 oz) - Yay! This thing is so fast....and so efficient. Two liters boiled every morning, and two every night, and less than one 8oz canister of fuel.
___ Added my Stubai Aluminum Crampons (21 oz) - Yay! They add stiffness to hiking boots enough to pretend to kick on snow, they're pretty light, they adjust quickly, and they fit well. And on softer snow like I had, they work great. Bulletproof ice would be a very different story.
___ Wild Things EP Jacket (18 oz) - Yay! Fits over all my layers including my thin down jacket, warm, windproof, very rain-resistant...and it's orange. What else could I want?
___ Insul-Mat (Pacific Outdoor) SL Mountain foam pad (14 oz) - OK... It would have been a YAY should I have needed to camp on the snow (I know from previous experience) but the soft foam wasn't stellar when I was pushing through early-season downed pine trees. By the end of the trip it had taken a beating.
___ Isis Whisper Down Jacket (14 oz) - OK.... Nice to have a thin down jacket for more warmth (I used it two nights) but the sleeves on this are a leeetle short...
___ Bear MACE and holster (13 oz) - ???... Didn't use, but there are some WEIRD PCT-ers that I saw who made some awfully pointed comments about me being a woman all alone out there... I was glad I had it.
___ Golite Gamut Jacket (13 oz) - Didn't use, but on previous trips it's been great.
___ Red Ledge Full Zip Rain Pants (10 oz) - Again, didn't use, but on previous trips they've been nice.
___ Moonstone Cirrus Vest (9 oz) - At the last minute, I left this in the car. Glad I did.
___ Patagonia Capilene 4 Hoodie (8 oz) - OK.... I love this hoodie for climbing, and it's super light, but the forearms...are...so...tight!! And sleeping in it at night makes the grid fabric press into my skin and my arms itch! Really Patagonia, you don't think women have burly forearms? Sheesh.
___ SPOT Messenger (8 oz) - Yay! My husband tracked me the whole time. Fun! Although it was interestingly weird being able to send my precise position to my husband, but not necessarily know it myself...
___ Camera and dry case (8 oz) - Yay! The proof is in the pudding, as they say.
___ Nalgene bottle (also for hot drinks) (7 oz) - OK, I might have brought a light mug and another Platypus bladder.
___ Princeton Tec EOS (4 oz) - Ended up bringing my 10 oz Black Diamond Soliras since it's brighter and I had just nearly epic-ed the Thursday before leaving with my EOS. For truly needing a headlamp for off-trail routefinding at night, the EOS is pretty weak.
___ Journal and Pencil (4 oz) - Yay! I wrote a lot, it saved me mentally.
___ Warm Hat (3 oz) - Yay!
___ Sunscreen (3 oz) - Yay!
___ Bug Repellent (3 oz) - Yay!
___ Platypus 1L flexible bottle (2 oz) - Yay! These things are so great and lightweight...but, they don't take boiling water, which was one of my main methods of purification.
___ Liner Gloves (2 oz) - Yay! Very necessary for going up Glen Pass
___ Custom Mytopo.com Map (2 oz) - Yay! One map, the entire trail. I carried it in my pocket the whole time, so we know the paper is sweatproof, at least.
Carried on Person: Pants, T-shirt, Sunhat, Sunglasses, Compass, Knife, Whistle, Socks, Boots, Trekking Poles with Whippet - All Yay!
Food and Fuel:
1.5 lbs per day x 6 days = 9 lbs (144 oz) - See Comments Below, 2200 calories per day was a good amount to plan around.
Two 4 oz isobutane canisters (8 oz) - Didn't need the second one because of the MSR Reactor's efficiency
Food in Detail:
___ 200 cal Breakfast:
Cream of Wheat - Yay! The best alternative to oatmeal, which I detest.
Hot Chocolate - Yay! And then there was the brilliant day that I added the hot chocolate to the Cream of Wheat....
Instant Miso Soup - Never used. With the Mountain House dinners, I definitely did not have a lack of salt intake.
___ 100 cal drink mix - Yay! I would have brought more for the more strenuous days.
___ 200 cal dried fruit - Yay! How else would I have gotten fiber without the ProBars below?
___ 400 cal Probar (mmmm....fiber) - Never used. Nearly a Boo. Good as meal replacements in my past experience, but not for meal augmentation. Too dense.
___ 300 cal 2 x Other Bars
Trader Joes Bars - OK, they do their job
Luna Bars - Chocolate Peppermint Stick is the most genius flavor out there, though I suppose that's a matter of opinion...
___ 200 cal Clif Shot Bloks - Yay! Nothing like gummies for adults.
___ 300 cal Cheese - Yay!
___ 200 cal Nuts - Yay!
___ 100 cal Jerkey - Yay!
___ 400 cal Dinner:
Mountain House - OK to Boo - For the meals that had less than 50% of my daily sodium in them, they were okay. Sometimes good actually. But, for example, Beef Stew which had more than 100% of my daily sodium in only about 400 calories, I was close to gagging. I can't take that much salt!
Instant Mashed potatoes - Yay! Add some cheese left over from earlier in the day, perfect.
And there you have it. It was a fun five days, and all the tools I brought helped me make it. Have fun planning your own!
Subscribe to:
Comments (Atom)
